If you’re a developer building modern web applications, you’ve probably heard of Redux. It’s a popular state management library for JavaScript applications, particularly those using React. However, working with plain Redux can be a bit verbose and challenging to set up. This is where the “Redux Toolkit” comes to the rescue, making state management more straightforward and efficient.
What is the Redux Toolkit?
Redux Toolkit is a library that simplifies the way you work with Redux. It’s an official package endorsed by the Redux team, which means you can trust it to follow best practices. It provides a set of utility functions and a recommended project structure that helps you write Redux code with less boilerplate.
Why Do We Use Redux Toolkit?
Reduced Boilerplate Code
Immutable Updates Made Easy
DevTools Integration
Predictable Code Structure
and many more...
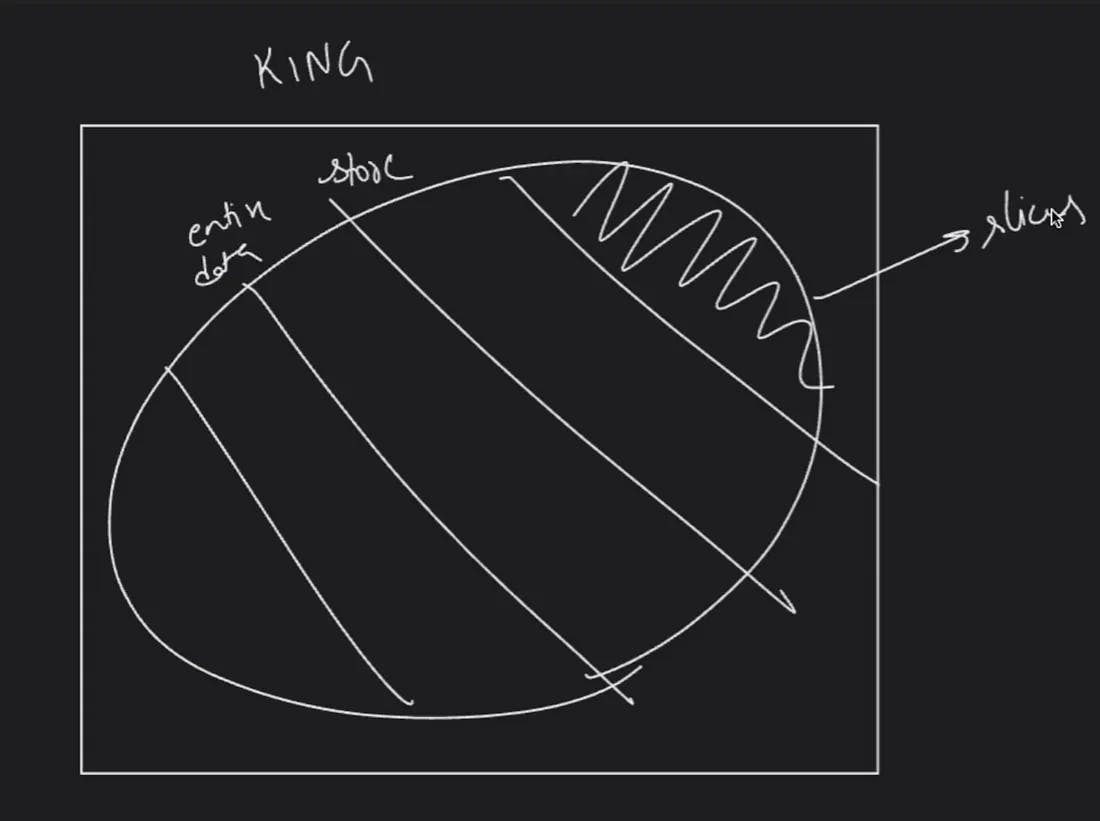
We have a centralized store to store the data. This centralized data is made up of many “slices”. A single portion of data is called a slice.

Let’s proceed to create a straightforward ‘Counter App’ as an illustrative example to comprehensively grasp the functionality and utilization of the Redux Toolkit.
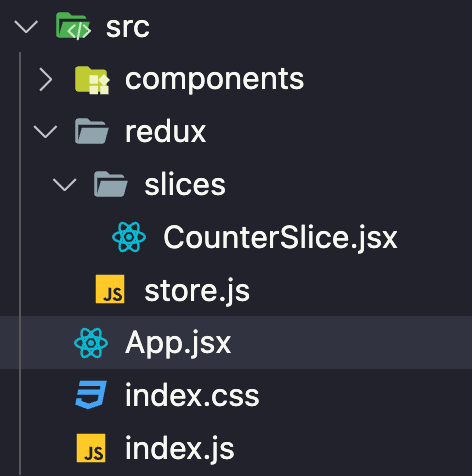
Let's see the folder structure first.

Create a React app. Then create a folder redux. Inside this create a folder named “slices”. Create a file CounterSlice.jsx inside the slices folder. Then create a store.js file inside the redux folder. All codes that are related to the redux toolkit are present inside the redux folder.
1st we have to create the slice.
1. createSlice()
To create slices we use thecreateSlice()function
To create Slices there are 3 main steps :
Name of the slices
Initial State of the slices
Reducer (Means the functions that are related to that slice)
“counter” is the name of the slice (you can take any name). The initial state of the value is 0. The main functions used to create this app are increment() and decrement() . The below code is used to create a slice.
This code is inside the CounterSlice.jsx file
import { createSlice } from "@reduxjs/toolkit";

// The initial value
const initialState = {
    value:0,
}

// CounterSlice is the slice
export const CounterSlice = createSlice({
    name:"counter",
    initialState,
    reducers: {
        increment : (state) => {
            state.value += 1;
        },
        decrement: (state) => {
            state.value -= 1;
        }
    }
})

// Most important thing
export const {increment, decrement} = CounterSlice.actions;
export default CounterSlice.reducer;
The last two lines are the most important. CounterSlice returned two things. One is actions and reducer . In actions , we find all the functions defined in the reducers. If you have many functions then you have to export those functions as well.
2. Redux Store
After that, we have to create a store, which is the centralized store.
We have to create a store that is like a centralized data container and we use “configure store” to create this store
Then we provide all the slices that we created before.
configureStore takes an Object as an argument, in that object, we have to pass keys and values.
The name of the key must be equal to the name of the slice.
import { configureStore } from '@reduxjs/toolkit'
import  CounterSlice  from './slices/CounterSlice'

export const store = configureStore({
    reducer: {
        counter: CounterSlice
    },
})
Our implementation of the Redux Toolkit code is now complete.
Now we have to link our React code with the Redux Toolkit.
How to link this redux toolkit code to our React code???
The answer is simple. With the help of Provider.
Go to index.js the file then wrap the <App/> with <Provider/> . We have to provide the store to <Provider store={store} > .
import { Provider } from "react-redux";
import { store } from "./redux/store";

<Provider store={store}>
    <App />
</Provider>
Now create our UI. In our case, we create a counter.jsx inside components folder. In our app, there are 3 elements are used. One is the increment button, the decrement button, and the value.
We have to use the “value” that is created in the initial state of CounterSlice. So how to do that?
How to extract any value from a slice ???
Using the “useSelector()” hook we can extract any value from a slice.
const count = useSelector((state) => state.counter.value);
Now how to use the increment and decrement functions that are created in reducers of slice.
How to use the functions which are exports from slice.action ???
Using the “useDispatch()” hook we can do this.
const dispatch = useDispatch();
<button onClick={() => dispatch(increment())}>
    Increment
</button>
<button onClick={() => dispatch(decrement())}>
    Decrement
</button>
Now to the whole code inside Counter.jsx
import React from 'react'
import { useDispatch, useSelector } from 'react-redux'
import { decrement, increment } from '../redux/slices/CounterSlice';

const Counter = () => {

    const count = useSelector((state) => state.counter.value);
    const dispatch = useDispatch();
  return (
      <div>
          <button onClick={() => dispatch(increment())}>
              Increment
          </button>
          <br />
          <br />
          <div>{count}</div>
          <br />
          <br />
          <button onClick={() => dispatch(decrement())}>
              Decrement
          </button>
    </div>
  )
}

export default Counter;
Conclusion
In conclusion, Redux Toolkit offers an elegant and efficient solution for state management in modern JavaScript applications. With its streamlined approach, simplified code structure, built-in tools for handling asynchronous actions, and seamless integration with the Redux DevTools Extension, it empowers developers to write cleaner, more maintainable code while enhancing application performance.
Whether you’re new to state management or a seasoned developer, Redux Toolkit is a valuable resource that can significantly improve your development workflow and the quality of your applications. Embracing the Redux Toolkit simplifies the complexities of state management, making it an essential tool in your development arsenal.
Special Thanks to Love Babbarbhaiya 🙏🏻
Happy coding, and keep building!

